Enable Cilium with KubeEdge
Abstract
This tutorial introduces how to enable Cilium Container Network Interface with KubeEdge.
Cilium is the one of the most advanced and efficient container network interface plugin for Kubernetes, that provides network connectivity and security for containerized applications in Kubernetes clusters. It leverages eBPF (extended Berkeley Packet Filter) technology to implement networking and security policies at the Linux kernel level, allowing for high-performance data plane operations and fine-grained security controls.
And KubeEdge extends the cluster orchestration capability down to edge environments to provide unified cluster management and sophisticated edge specific features.
Enabling Cilium with KubeEdge allows us to take advantage of both benefits even for edge computing environments.
We can deploy the application containers where EdgeCore running and bind Cilium to connect with workloads in the cloud infrastructure.
This is because Cilium can also enable WireGuard VPN with transparent encryption of traffic between Cilium-managed endpoints.
Further more, we can also rely on Cilium Tetragon Security Observability and Runtime Enforcement to confine security risk and vulnerability in edge environment.
Getting Started
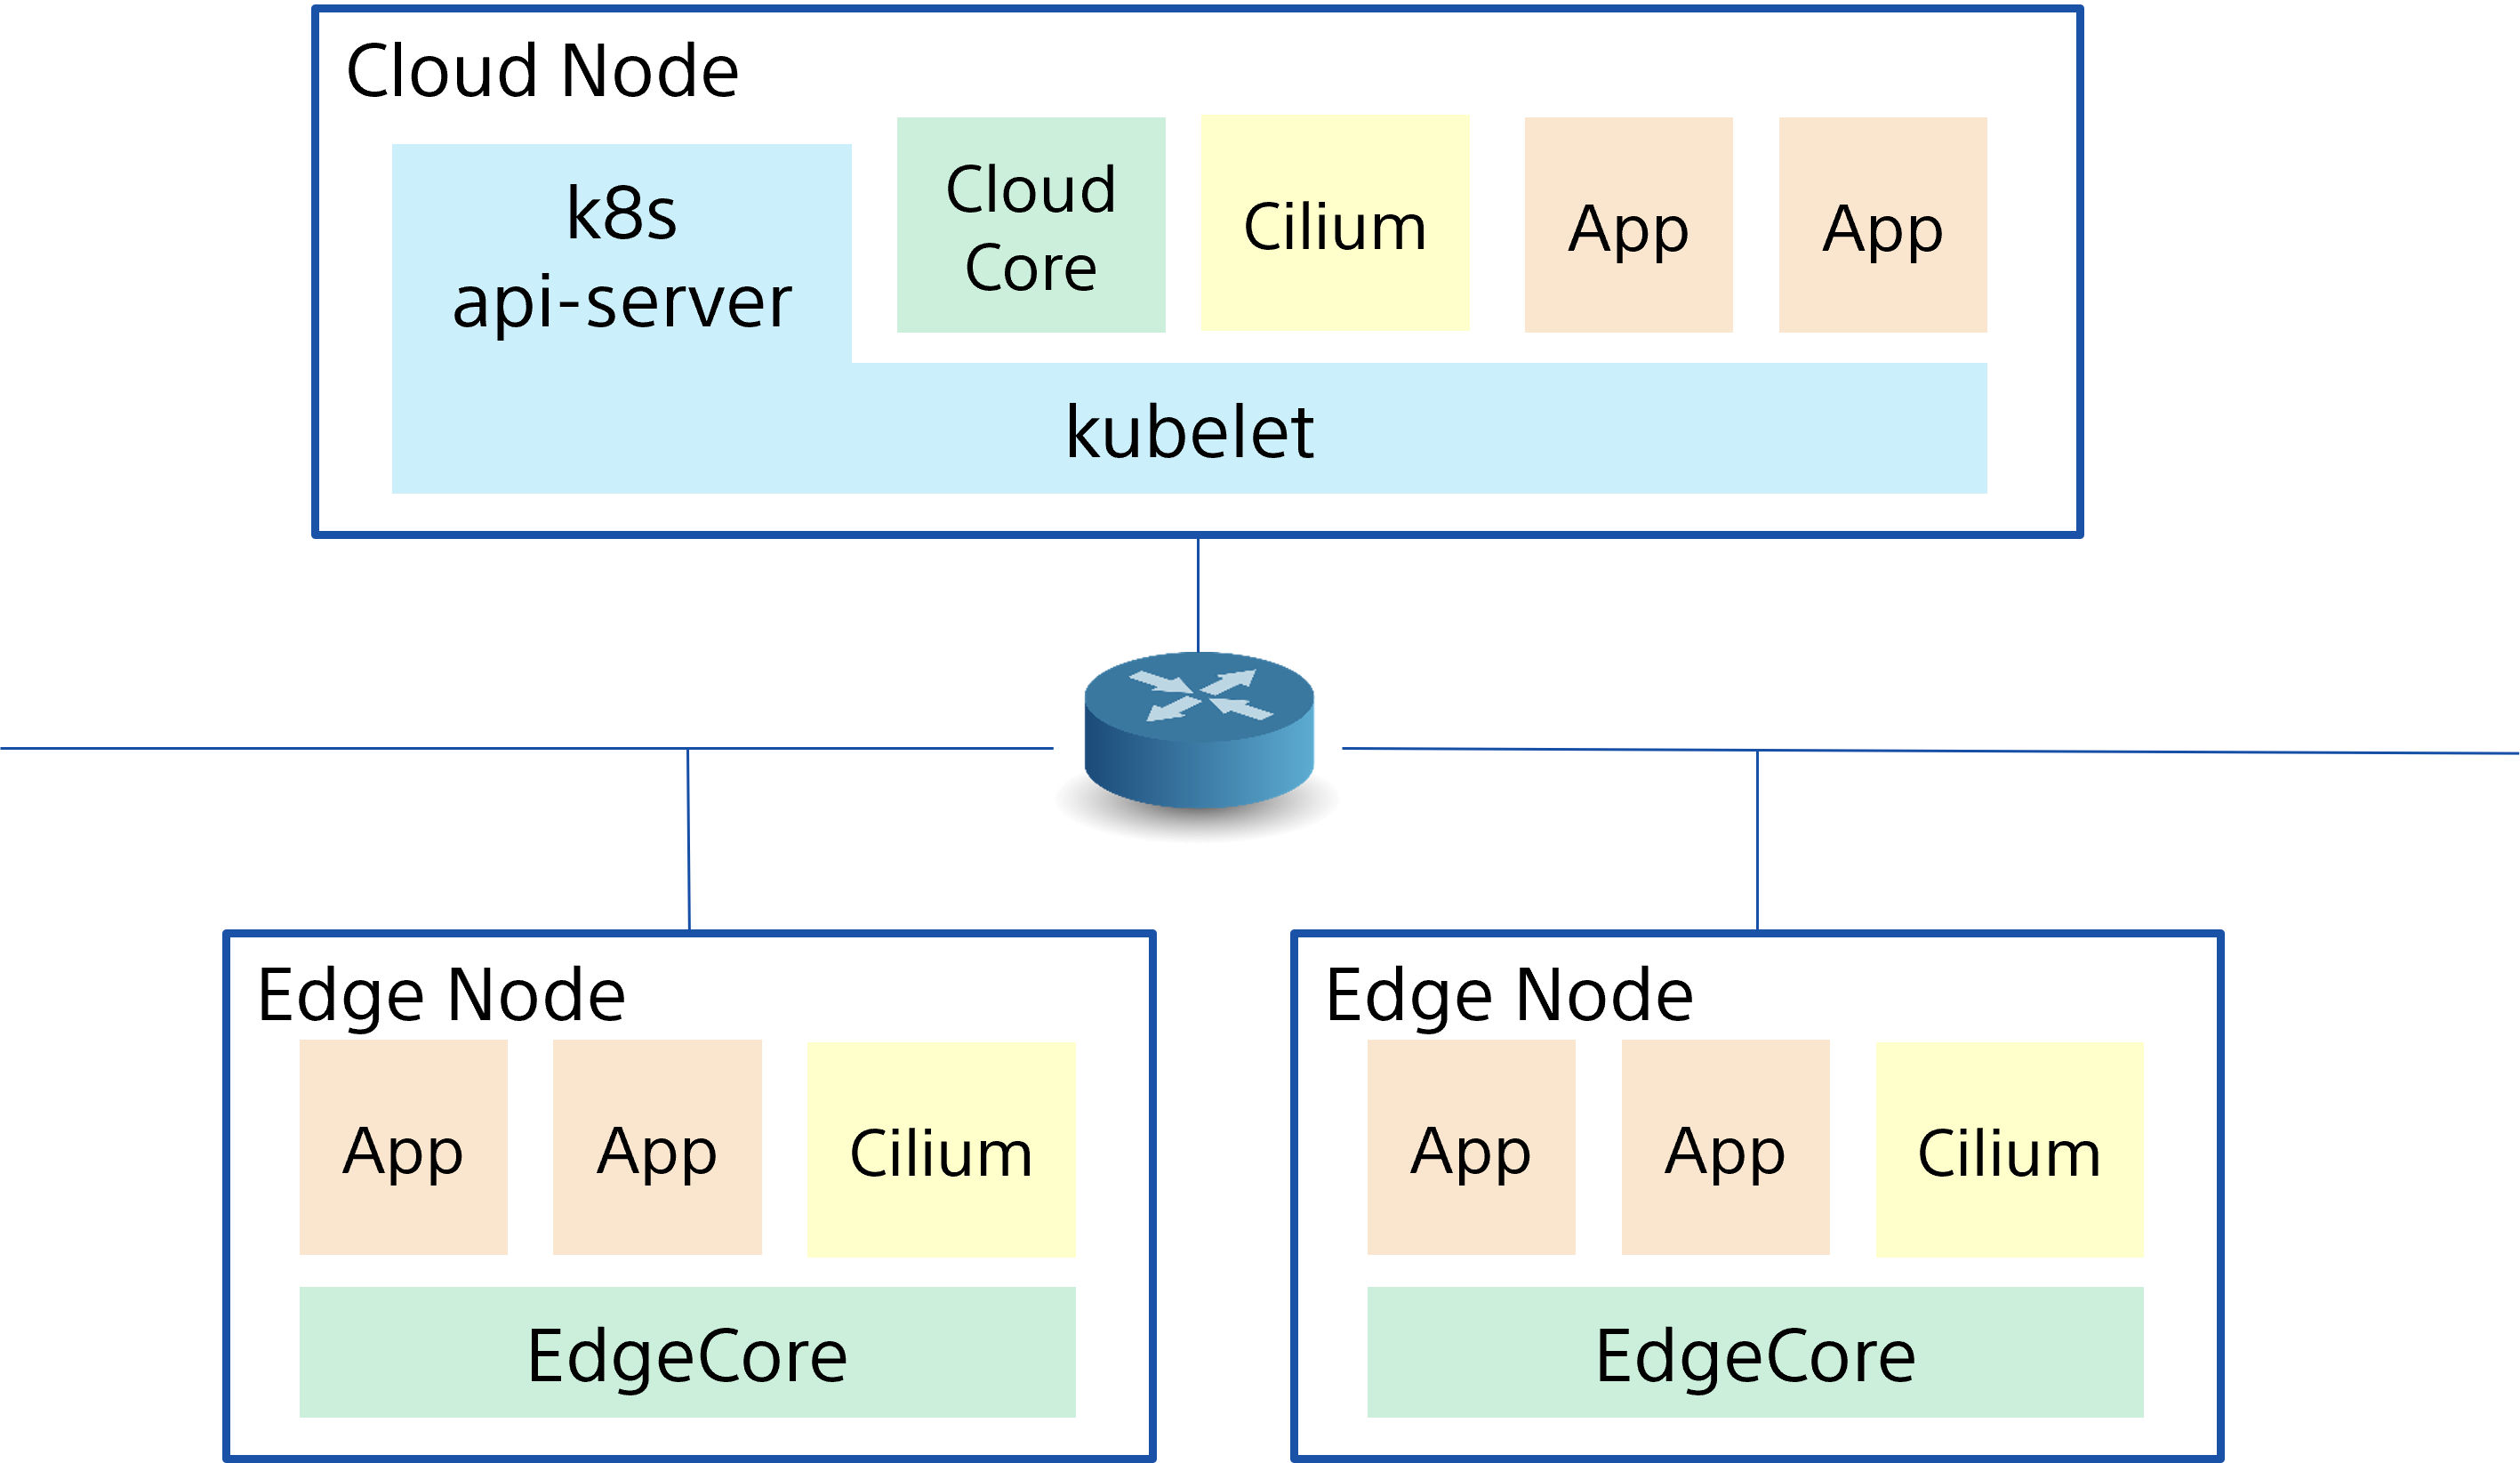
The following procedures to set up a simple cluster system with Kubernetes and KubeEdge with Cilium. After all the operations, we can develop the following cluster configuration with KubeEdge with Cilium.
- Prerequisites
- Kubernetes Master Setup
- Cilium Installation
- CloudCore Installation
- EdgeCore Installation
- Check Cilium Connectivity from Pods
Prerequisites
KubeEdge Release v1.16 or later required.
This is because that
cilium-agentneeds to issueInClusterConfigAPIs to Kubernetes API server to configurecilium-agent, for KubeEdge those API requests and responses need to be bypassed via KubeEdge MetaManager. You can see KubeEdge EdgeCore supports Cilium CNI for more details.You can find compatible and supported Kubernetes version here.
It Requires super user rights (or root rights) to run commands.
Kubernetes Master Setup
Refer to KubeEdge Setup Prerequisites, and set up the Kubernetes API server as following.
$ kubectl get nodes -o wide
NAME           STATUS   ROLES           AGE     VERSION    INTERNAL-IP     EXTERNAL-IP   OS-IMAGE             KERNEL-VERSION       CONTAINER-RUNTIME
tomoyafujita   Ready    control-plane   5m57s   v1.29.13   AA.BBB.CCC.DD   <none>        Ubuntu 20.04.6 LTS   5.15.0-139-generic   containerd://1.7.27
Taint control-plane node so that CloudCore can be deployed on the control-plane
> kubectl taint node tomoyafujita node-role.kubernetes.io/control-plane:NoSchedule-
node/tomoyafujita untainted
> kubectl get nodes -o json | jq '.items[].spec.taints'
null
Cilium Installation
Refer to Cilium Quick Installation, install and set up cilium deployments in the cluster.
$ cilium version
cilium-cli: v0.18.3 compiled with go1.24.2 on linux/amd64
cilium image (default): v1.17.2
cilium image (stable): v1.17.4
cilium image (running): 1.17.2

$ cilium install --set encryption.enabled=true --set encryption.type=wireguard
ℹ️  Using Cilium version 1.17.2
🔮 Auto-detected cluster name: kubernetes
🔮 Auto-detected kube-proxy has been installed

$ cilium status
    /¯¯\
 /¯¯\__/¯¯\    Cilium:             OK
 \__/¯¯\__/    Operator:           OK
 /¯¯\__/¯¯\    Envoy DaemonSet:    OK
 \__/¯¯\__/    Hubble Relay:       disabled
    \__/       ClusterMesh:        disabled

DaemonSet              cilium                   Desired: 1, Ready: 1/1, Available: 1/1
DaemonSet              cilium-envoy             Desired: 1, Ready: 1/1, Available: 1/1
Deployment             cilium-operator          Desired: 1, Ready: 1/1, Available: 1/1
Containers:            cilium                   Running: 1
                       cilium-envoy             Running: 1
                       cilium-operator          Running: 1
                       clustermesh-apiserver
                       hubble-relay
Cluster Pods:          2/2 managed by Cilium
Helm chart version:    1.17.2
Image versions         cilium             quay.io/cilium/cilium:v1.17.2@sha256:3c4c9932b5d8368619cb922a497ff2ebc8def5f41c18e410bcc84025fcd385b1: 1
                       cilium-envoy       quay.io/cilium/cilium-envoy:v1.31.5-1741765102-efed3defcc70ab5b263a0fc44c93d316b846a211@sha256:377c78c13d2731f3720f931721ee309159e782d882251709cb0fac3b42c03f4b: 1
                       cilium-operator    quay.io/cilium/operator-generic:v1.17.2@sha256:81f2d7198366e8dec2903a3a8361e4c68d47d19c68a0d42f0b7b6e3f0523f249: 1
CloudCore Installation
Install keadm with the official procedure Installing KubeEdge with keadm.
In this blog, we use keadm v1.19.2 as following.
$ wget https://github.com/kubeedge/kubeedge/releases/download/v1.19.2/keadm-v1.19.2-linux-amd64.tar.gz
$ tar -zxvf keadm-v1.19.2-linux-amd64.tar.gz
$ cp keadm-v1.19.2-linux-amd64/keadm/keadm /usr/local/bin
$ keadm version
version: version.Info{Major:"1", Minor:"19", GitVersion:"v1.19.2", GitCommit:"4e57dabf1f8f51cee0644302c8b4946225b0c33d", GitTreeState:"clean", BuildDate:"2025-01-14T01:25:12Z", GoVersion:"go1.21.11", Compiler:"gc", Platform:"linux/amd64"}
And then, deploy the CloudCore in the cluster.
$ keadm init --advertise-address="AA.BBB.CCC.DD" --kube-config=/root/.kube/config
I0520 11:53:30.502212 3128186 common.go:434] remote version is much newer: v1.20.0; falling back to: v1.19.2
Kubernetes version verification passed, KubeEdge v1.19.2 installation will start...
CLOUDCORE started
=========CHART DETAILS=======
Name: cloudcore
LAST DEPLOYED: Tue May 20 11:53:30 2025
NAMESPACE: kubeedge
STATUS: deployed
REVISION: 1
Once CloudCore is installed, execute configure_cilium to apply cilium-specific changes to the CloudCore.
This scripit automatically applies the necessary changes to enable cilium with CloudCore.
$ wget https://raw.githubusercontent.com/kubeedge/kubeedge/master/hack/configure_cilium.sh
$ ./configure_cilium.sh cloudcore
All prerequisites satisfied for cloudcore.
Patches main Cilium DaemonSet to exclude edge nodes...
daemonset.apps/cilium patched
Enables dynamicController in CloudCore ConfigMap...
Finally save the token for next EdgeCore installation.
$ keadm gettoken
<YOUR_TOKEN>
EdgeCore Installation
With the token provided above, we can start the EdgeCore to join the cluster system.
$ keadm join --cloudcore-ipport=AA.BBB.CCC.DD:10000 --cgroupdriver=systemd --token <YOUR_TOKEN>
...<snip>
I0520 11:56:01.694195 1411102 join_others.go:275] KubeEdge edgecore is running, For logs visit: journalctl -u edgecore.service -xe
I0520 11:56:11.703347 1411102 join.go:94] 9. Install Complete!

$ systemctl status edgecore
● edgecore.service
     Loaded: loaded (/etc/systemd/system/edgecore.service; enabled; vendor preset: enabled)
     Active: active (running) since Tue 2025-05-20 11:56:01 PDT; 33s ago
   Main PID: 1411360 (edgecore)
      Tasks: 24 (limit: 18668)
     Memory: 38.1M
        CPU: 3.149s
     CGroup: /system.slice/edgecore.service
             └─1411360 /usr/local/bin/edgecore
...<snip>
Once EdgeCore starts running, execute configure_cilium to apply cilium-specific changes to the EdgeCore.
This scripit automatically applies the necessary changes to enable cilium with EdgeCore.
$ wget https://raw.githubusercontent.com/kubeedge/kubeedge/master/hack/configure_cilium.sh
$ ./configure_cilium.sh edgecore
  % Total    % Received % Xferd  Average Speed   Time    Time     Time  Current
                                 Dload  Upload   Total   Spent    Left  Speed
  0     0    0     0    0     0      0      0 --:--:-- --:--:-- --:--:--     0
  0     0    0     0    0     0      0      0 --:--:-- --:--:-- --:--:--     0
100 10.7M  100 10.7M    0     0  7787k      0  0:00:01  0:00:01 --:--:-- 24.9M
All prerequisites satisfied for edgecore.
Updating edgecore configuration...
Configuration completed.
Check Cilium Connectivity from Pods
Now Cilium should be ready to be used for application pods to provide network connectivity.
We can use busybox DaemonSet as following to try ping the network connectivity via Cilium.
$ cat busybox.yaml
apiVersion: apps/v1
kind: DaemonSet
metadata:
  name: busybox
spec:
  selector:
    matchLabels:
      app: busybox
  template:
    metadata:
      labels:
        app: busybox
    spec:
      containers:
      - image: busybox
        command: ["sleep", "3600"]
        imagePullPolicy: IfNotPresent
        name: busybox

$ kubectl apply -f busybox.yaml
daemonset.apps/busybox created

$ kubectl get pods -o wide
NAME            READY   STATUS    RESTARTS   AGE   IP           NODE           NOMINATED NODE   READINESS GATES
busybox-mn98w   1/1     Running   0          84s   10.0.0.58    tomoyafujita   <none>           <none>
busybox-z2mbw   1/1     Running   0          84s   10.0.1.121   edgemaster     <none>           <none>

$ kubectl exec --stdin --tty busybox-mn98w -- /bin/sh
/ #
/ # ping 10.0.1.121
PING 10.0.1.121 (10.0.1.121): 56 data bytes
64 bytes from 10.0.1.121: seq=0 ttl=63 time=1.326 ms
64 bytes from 10.0.1.121: seq=1 ttl=63 time=1.620 ms
64 bytes from 10.0.1.121: seq=2 ttl=63 time=1.341 ms
64 bytes from 10.0.1.121: seq=3 ttl=63 time=1.685 ms
^C
--- 10.0.1.121 ping statistics ---
4 packets transmitted, 4 packets received, 0% packet loss
round-trip min/avg/max = 1.326/1.493/1.685 ms
/ # exit
$ kubectl exec --stdin --tty busybox-z2mbw -- /bin/sh
/ #
/ # ping 10.0.0.58
PING 10.0.0.58 (10.0.0.58): 56 data bytes
64 bytes from 10.0.0.58: seq=0 ttl=63 time=0.728 ms
64 bytes from 10.0.0.58: seq=1 ttl=63 time=1.178 ms
64 bytes from 10.0.0.58: seq=2 ttl=63 time=0.635 ms
64 bytes from 10.0.0.58: seq=3 ttl=63 time=1.152 ms
^C
--- 10.0.0.58 ping statistics ---
4 packets transmitted, 4 packets received, 0% packet loss
round-trip min/avg/max = 0.635/0.923/1.178 ms
Finally we can confirm the cross-communication via Cilium between busybox containers are just fine!!!